
[ad_1]
Learn how to set up the Gala node in 10-15 minutes…
What is a Gala node:
By becoming a Gala node, you help to secure the network. In return, you will get daily distribution in the form of Gala tokens, NFT, game items, and the Townstar coins. If you believe in Gala games, this is the best way to support the growth of this ecosystem.
The Gala token has also been appreciated a lot in recent times. You can get Gala tokens from the following exchanges:
Steps to set up Gala node:
There are a few steps needed to set up your own Gala node. You can set it up on your local server or on a cloud server. The cloud server is the best as it runs 24*7, and you pay a nominal amount of $20/month to run the server. I’m using the Vultr server, which is currently offering a $100 promo using this link, which means your first 5 months are free.
Here are steps needed to set up a Gala node:
- Setup Gala account and buy a Gala Node
- Buy server for Gala and deploy a server
- Connect Server with Terminal or Putty and Change Machine ID
- Connect and Setup Gala node
- Useful tips for Gala node owners
Let’s get started
Step 1. Setup Gala account and buy a Gala node:
This is a three-step process:
- Create a Gala account
- Fund your account using ETH
- Buy the Gala node license
The very first thing you need to do is, create a Gala account and set up your profile including 2FA. After that click on inventory and deposit the required ETH to buy the Gala node.

The price depends on current market price, so you need to calculate how much ETH required gala would be. At the time of writing this, buying a founders Gala node costs about 29 ETH ($90,000).

Click on place order, and make payment to confirm your purchase of the Gala node license.
Once this is done, we will move to the second and most important part.
Step 2. Buy a server for Gala and deploy the server
Now, you have multiple options for running a Gala node server. Here I’m sharing the exact steps you need to follow to launch your server.
We are using the Vultr server which is a cloud infrastructure, and let you deploy Linux or Windows machine type on the cloud. You can deploy your server on Windows or Linux (Your choice), and in this guide, we will be using Linux only. If you want to deploy on Windows, you should check out this tutorial.
$100 free cloud server:
So when I logged into my Vultr server, I saw it’s offering a $100 free promo for the new users. I got only $50 using someone else’s promo, but you can use the link below to take advantage of the $100 promo. That means, your first 5 months are free.
Once you have created your Vultr account, you need to buy a server. Here you can see the latest requirement for running a Gala node. At the time of writing, these are the requirements:
- 4 GB RAM
- 2 CPU Cores
- 60 GB Disk Space
On Vultr, select Cloud Compute and select a location that is nearest to you.

Select the Ubuntu as your server type and version as 20.04 x64

Now pick the plan which is the same or more than the required config.
- 4 GB RAM
- 2 CPU Core
- 60 GB Disk Space

It should cost around $20/month and with a $100 promo, your first months are free.
In the additional features section, no need to select anything, give a name to your server and when you are ready click on deploy.
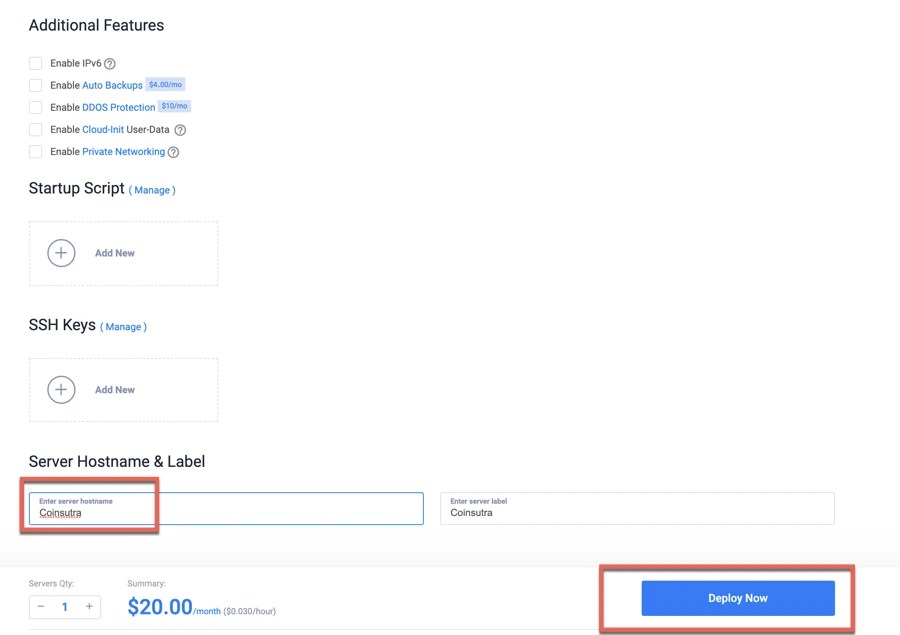
That’s it, your server would be live within a minute.


We would be needing an IP address, username, and password in the next step to connect with the server.
Step 3. Connect to your server and change the Machine ID on Linux:
The very thing you need to do is to connect with your server via SSH tool such as Putty (Graphical interface) or via Terminal on Mac.
If you are using Mac, you can use Terminal which is also simple to use.
Open the Terminal app (search Spotlight) on your Mac and connect with your server using these commands:
Type ssh [email protected] where x.x.x.x is your VPS IP address
Click on Yes, and copy paste your password to log in to your newly created VPS server.
Before you do anything else, you need to change the Machine ID.
If you are wondering why you have to do this, you can read it here.
Here are the three commands you need to run:
sudo rm /etc/machine-id /var/lib/dbus/machine-id
sudo dbus-uuidgen | sudo tee /etc/machine-id
sudo cp /etc/machine-id /var/lib/dbus/machine-id
Once this is done, reboot your server by using the command
sudo reboot

Once the server is rebooted, we are ready for the next step and that is to install the Gala node server on our VPS server.
Do log in to your server again by using the ssh [email protected] command again.
Step 4: Install and configure Gala node:
First run this script: sudo apt-get update && sudo apt-get upgrade -y
Download the node software package. Type in:
wget -O install-headless.sh https://static.gala.games/node/install-headless.sh; sudo bash install-headless.sh
and hit Enter.
Follow the prompts and you should be good to go!

Once the installation completes, you would get the following link on the terminal.

You need to copy paste that in the browser and authenticate using your Gala login and 2FA (If enabled).


Once this is confirmed, you would see a screen like this where you need to select your node name and click on save and then exit.

And Congratulations! Your Gala node is active and already running! ✅
Step 5: Verify everything and enjoy passive income:
Now your main job is done, but before you enjoy your passive income, you should verify if everything is working fine or not.
Make sure to run the command gala-node stats
and check for a value that says msActiveToday and it should be more than 0. If it is not, then rerun the command after 1 minute.
Also, go to your Gala account and under node info, you would see your connected node status like shown in the screen below.

As you can see in the screenshot above, the founder’s node is online, and now every 24 hours Gala would distribute the daily rewards.
Here are some useful info regarding Gala token and Gala nodes owners:
- Right now you get like 400 Gala. So $120 a day
- Any future in game coin you get a cut with founders node
- Any NFTs that gets released 5% gets airdropped to founder nodes. Even the town nodes. So you could get lucky and get one for free. Though its a low chance.
- Gala also plan to make these license an NFT, so you can resale it in the future
- Don’t forget the halving of Gala rewards in July 2022 though. But I think by then hopefully more games are out and those other coins make up the difference. For example, town tokens increase like 1% or so a day right now cuz more people play”
With the current price of Gala ($0.35), you could earn $43800 in one year + price appreciation + airdrop + anything else…
Here are a few useful links for you to explore more on the Gala node :
Transparency Notice: CoinSutra content is reader-supported, which means if you click on some of the links in this website, we may earn a small referral fee. Please know that we only recommend products that we use ourselves and/or believe will add value to our readers.
Hows your experience as a Gala node owner? What do you think is the future proposition of Gala ecosystem? Are they designing and launching the games to support the kind of ecosystem they are building? Let me know your answers in the comment section below.
Harsh Agrawal is the Crypto exchange and bots expert for CoinSutra. He founded CoinSutra in 2016, and one of the industry’s most regarded professional blogger in the fin-tech space.
An award-winning blogger with a track record of 10+ years. He has a background in both finance and technology and holds professional qualifications in Information technology.
An international speaker and author who loves blockchain and crypto world.
After discovering about decentralized finance and with his background of Information technology, he made his mission to help others learn and get started with it via CoinSutra.
Join us via email and social channels to get the latest updates straight to your inbox.
[ad_2]
Source link